XviD Setup Guide
Select the "XviD MPEG-4 Codec" (note that you can select any codec you want here, if you don't want to convert to XviD). Press the "Configure" button, and you should see the window below. We'll only provide instructions for 2-pass encoding with XviD, as the other types of encodings are pretty simple if you've done DivX conversion before.
Introduction :
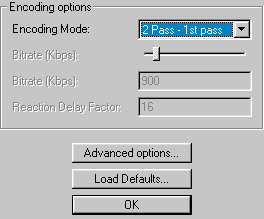
Encoding Mode
This is where you select what kind of encoding you want to use with the XviD codec.
The 1-pass settings are :
- 1 Pass - CBR : constant bit rate throughout the movie.
- 1 Pass - quality : allows you to set the quality of the movie, with each frame getting the same amount of compression throughout the movie. The quantizer (the level of detail removal) fluctuates. Compression level based on a quality setting (from 0 to 100).
- 1 Pass - quantizer : same as "1 Pass - quality", except that the quantizer (the level of detail removal) is a fixed value. Compression level based on quantizer setting.
For this guide, we'll use 2-pass encoding, since it gives a more precise final file size, and will produce the best quality encoding (for that particular file size).
The Steps :
2-pass Encoding - The First Pass :
- Select "2 Pass - 1st pass" for the "Encoding Mode :" option
- Press the "Advanced Option" button, and you should see the following screen :
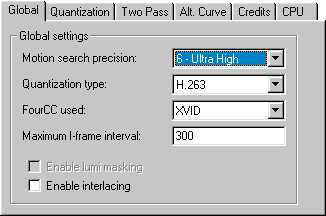
- An explanation of the settings in this section :
- Motion search precision - sets how much "work" the XviD codec should do to determine the quality of the encoding for the given bitrate/file size. A higher setting will mean a better quality. You usually want to stick to a setting of 5 - Very High for most low-to-medium quality encodings, while a setting of 6 - Ultra High will give you the best possible quality, but with a noticeable encoding speed reduction (around 10%).
- Quantizer type - Choosing a setting of H.263 will give you a smoother looking video which works best with low-to-medium bitrate/quality encodings (goes well with a Motion search precision setting of 5 - Very High). Otherwise, choose MPEG for high bitrate/quality encodings (goes well with a Motion search precision setting of 6 - Ultra High). The other 2 settings (MPEG-Custom and Modulated" are for expert users, and if you are one then you should already know what these settings do :)
- FourCC used - the FourCC code determines which codec your encoded movie will be played with. Leaving it as XVID means that the XviD directshow filters will be used for maximum quality/compatibility. You can also select to use the DivX 4.x or 5.x codec to playback your encoding, which may or may not work properly.
- Maximum I-frame interval - MPEG videos are encoded using I-frame (also known as keyframes, frames where information for the whole frame is recorded), P-frame (prediction frames, where data is predicted forward and stored in this frame) and B-frames (bidirectional prediction frames, where data is predicted forwards and backwards and stored in this frame - this gives the best quality - unfortunately, B-Frames not yet support by XviD).
If you want to playback a movie and seek to parts of it, the movie will only be properly played back once it goes to the nearest keyframe, so it isn't good to have very few keyframes, since you'll be unable to skip to parts of the movie. Keyframes are automatically inserted by the codec at scene changes, but just to make sure seeking is still possible with movies that have very few scene changes, set this setting to ten times the framerate of the movie (eg. 240, 250 or 300) will mean that at the very least, you'll have a keyframe every ten seconds, and you'll always be at most 10 seconds away from a keyframe when seeking.
- Click on the "Two Pass" tab and you should see a screen like this :
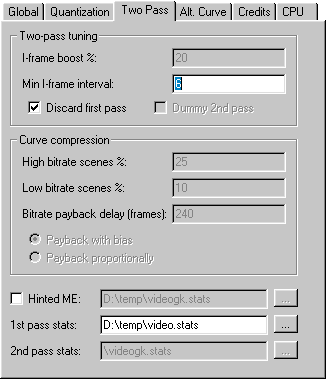
- An explanation of the settings in this section :
- Minimum I-frame interval - Just like the "Maximum I-Frame interval" setting above, this sets the minimum number of frames betwen keyframes. While having a keyframe every second would do wonders for seeking, it has other side-effects like quality loss. The default value of 6 seems to be good enough, so just leave it alone.
- Discard first pass - A video file is usually generated during the first pass, which isn't of much use at all (since the stats files (see below) contain all the information the second pass (see further below) needs anyway. This option is enabled by default, and you should leave this setting as it is.
- Hinted ME - this is similar to DivX 5.x's MV (motion vector) logging, which increases the speed of the 2nd pass.
- 1st pass stats - this is where you specify where you want to save the LOG/stats files that will be used for the second pass (see below).
- The "Credits" section allows you to specify where the credits at the beginning and end of a movie are (ie. the part where you don't need to have maximum quality), so you can decrease quality for these parts to minimize file size. There are three main ways that credits are encoded to reduce file size, quantizer (quality of credits based on how much information you want to remove, ie. a low quantizer means removing less from the frame, and larger file size), percentage (quality/size of the credits as a percentage of the movie bitrate) and set size (credits are of a set size). If you want to use quantizer mode, you should select the I-Frame/P-Frame quantizer settings right now (remember, low quantizer equals better quality/larger file size), otherwise, we can wait until the second pass (see below) to set this setting.
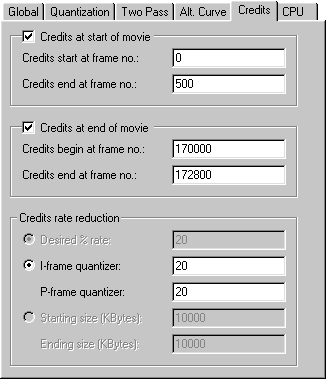
- We are now finished with first pass settings.
2-pass Encoding - The Second Pass :
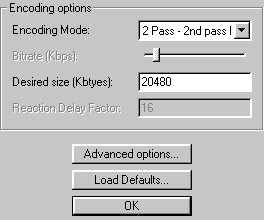
- Select "2 Pass - 2nd pass Int." for the "Encoding Mode :" option
- Desired size (Kbytes) - This is where XviD differs from the approach taken by DivX. Instead of specifying a bitrate, and using a bitrate calculator to calculate the final size, XviD does it for you using this setting. Basically, this setting sets (roughly) how big your final file would be (video only, without audio) in Kbytes (1 Kbyte = 1024 Bytes ; 1 MB = 1024 Kbytes). Of course, the smaller the file size, the poorer the quality.
- Press the "Advanced Option" button, and you should see the following screen :
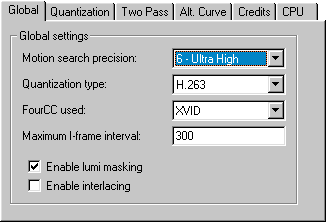
- Enable lumi masking - this is similar to the psychovisual enhancement feature in DivX 5.x, and similar to how MP3 compresses audio by removing data the human ear can't pick up, here, data the human eye can't distinguish is removed. Just like psychovisual on DivX 5.x, there may be distortion effects when this is enabled, so don't do it unless you are hard up on space.
- Click on the "Quantization" tab and you should see a screen like this :
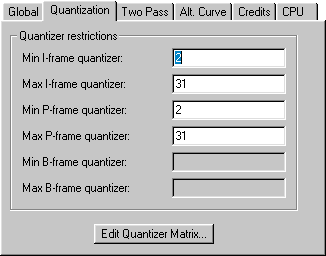
- As explained previously, a quantizer level refers to the amount of detail you want to remove from the movie - the higher the quantizer level, the lower the quality. Throughout the movie, the quantizer setting may change (as determined by the codec) to reflect what is going on in the movie (eg. scenes with little detail will use a higher quantizer level). The Min/Max I/P-frame quantizer settings allow you to set the maximum and minimum quantizer levels to be used in the encoding. The default setting for Min I/P-frame quantizer is perhaps too low, so you will want to at least increase these values to 2 (see screenshot above). While you can decrease the Max I/P-frame quantizer settings to increase quality, the problem with this is that if you decrease the range of the quantizer settings, the codec will have a lot less quantizer levels to work with, and hence, file size may not be close to what you specified previously in the Desired size (Kbytes) setting. As mentioned before, B-frames are not yet available for XviD, and this is why the "Max/Min B-frame quantizer" settings are greyed out.
- Click on the "Two Pass" tab and you should see a screen like this :
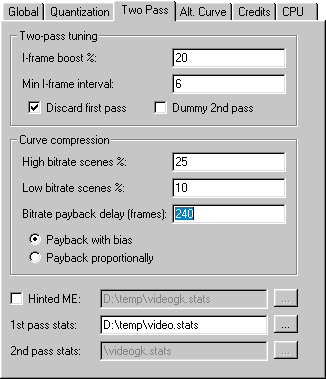
- An explanation of the settings in this section :
- I-frame boost % - This setting gives the I-frame (keyframe) some extra room. The default setting of 20% is fine.
- Minimum I-frame interval - This should be the same as what you specified for the first pass (see above).
- Curve compression - Unless you know what you are doing, these settings should be left alone. These settings basically tell the codec how to treat high/low bitrate scenes (how many bits should be removed from these scenes, as a percentage, and how many frames the codec should use to compensate for over or under-use of bits). Payback with bias should also be left alone as the default choice.
- Hinted ME - This should be the same as what you specified for the first pass (see above).
- 1st pass stats - This should be the same as what you specified for the first pass (see above).
- Click on the "Alt Curve" tab and you should see a screen like this :
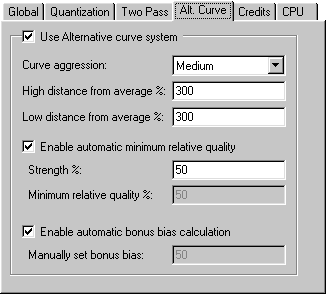
- All the options in this section are to do with how the codec deals with low/high bitrate scenes in greater detail, so if you are not 100% sure what to do here, just leave it alone (disable "Use Alternative curve system"). An explanation of the settings in this section :
- Curve agression - This setting has to do with how the codec deals with low/high bitrate frames. A setting of "High" will favor low bitrate frames at the expense of high bitrate frames. A setting of "Low" will favor high bitrate frames over low bitrate ones. Therefore, the setting of Medium seems like a good mid-point between these two extremes.
- High distance from average % - Has to do with how high bitrate frames are treated - increasing it will favor high bitrate frames.
- Low distance from average % - Has to do with how low bitrate frames are treated - decreasing it will favor low bitrate frames.
- Strength % - The default setting of 50 seems to be a good value here.
- Bonus bias - Manually setting this value to a higher one will mean the codec will favor low bitrate frames more.
- As explained before (see above), the "Credits" section allows you to specify how to lower the quality of the credits section of a movie, to decrease file size. Two new options are now available after the first pass, Desired % rate (quality/size of the credits as a percentage of the movie bitrate) and Starting/Ending size (KBytes) (credits are of a set size). If you used the I/P-frame quantizer settings in the first pass (you have to specify this setting in the first pass), leave this setting the same as what was set in the first pass.
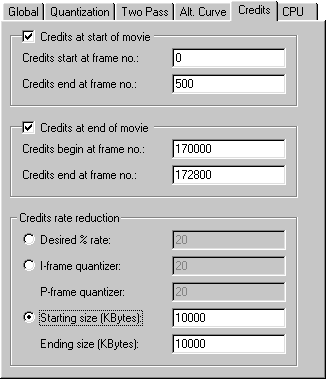
- We are now finished with second pass settings.

