You will need the following:
- vStrip(strips the Dolby Digital
sound from the VOBs)
- MPEG2Avi/AC3dec/vStrip GUI(Graphical
User Interface for vStrip)
- AC3-MODIFIED Virtual Dub(merges the
Dolby Digital audio with the video)
- That’s all!!! =P
Also,
if you should happen to have (the non-free) Soft Encode from Sonicfoundry, or
you are going to buy it, that is an advantage. With it you can take the Dolby
Digital audio and for example lower it’s bitrate or remove channels. This is of
course not required, but if you have the program, it can help you in making a
Dolby Digital rip.
Before you begin, please download and install the required software.
Step 1: Extracting the Dolby Digital audio from the VOBs
Using
the vStrip GUI:
Go to
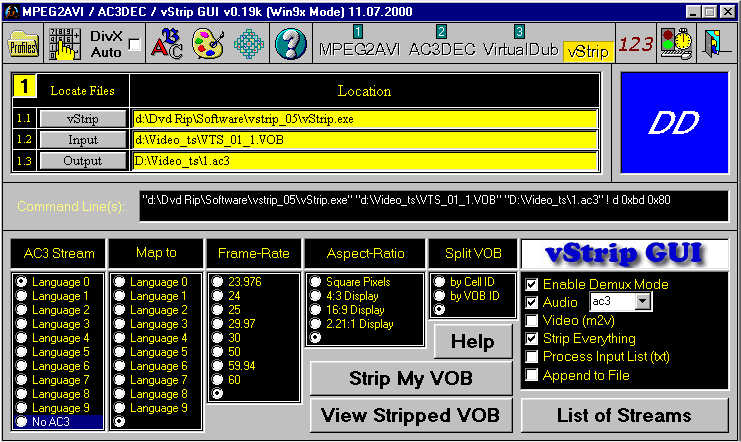
the folder where you put the vStrip GUI, and run GUI.exe. This pops up:

Well
not exactly, the above is how the program looks after you’ve selected “vStrip”
on the top menu.
When
you have the above on your screen, tell the program where “vStrip.exe” is
located by clicking “vStrip” under “Locate Files”.
Then
tell the program where the FIRST VOB-file is, I think you’ll figure out how to
do that yourself. =P
Next,
click “Output” and tell the program where the AC3 file from the first VOB
should be put and what it should be called.
All 6
settings below “Command Line(s)” should be set just as on the above picture.
The exception is “AC3 Stream” where you can select what language you want to
rip from the DVD. Select “Language 0” if you want to use the DVD’s primary
language.
All
settings set? OK, click “Strip My VOB”, and wait…
When
it’s done, go back to vStrip and select the next VOB. The output AC3-filename
should of course be set to something else too, for example “2.ac3”. Make sure
the other settings are like they were on processing the first VOB, then click
“Strip My VOB” and wait (again).
I
think you get the idea now… go back to vStrip and do the next VOB, and so on
and so on until you’ve processed all VOBs.
Joining
the several AC3-files together:
Now you should have one Dolby Digital AC3-file for each VOB from the DVD. But we gotta join them together to form one!
To do
this, open MS-DOS prompt if you’re using Windows 98, or cmd if you’re using
Windows 2000.
In
DOS prompt (or cmd), go to the folder where you have your AC3-files. If you’re
not familiar with the basic MS-DOS commands, here are those you need:
cd\
(takes you to
the root of the current disk)
x:
(takes you to
a disk, where “x” is the disk’s letter)
cd
y (takes you
into a folder, where “y” is the folder’s name)
When
you’re in the folder where your AC3-files are, “fill in” and type in the below:
copy
/b a.ac3+b.ac3+c.ac3+d.ac3+e.ac3 Whatever.ac3
In
the above, “a” is the name of the AC3 from the first VOB, “b” is the name of
the one from the second, “c” is the one from the third and so on and on! Notice
that there is NO “+” between “e.ac3” and “Whatever.ac3”! “Whatever.ac3” is what
you want to call the combined AC3-files.
Sooooo:
if I had AC3s from 6 VOB files, and I had named them “1.ac3” through “6.ac3” in
vStrip, I would type:
copy
/b 1.ac3+2.ac3+3.ac3+4.ac3+5.ac3+6.ac3 Audio.ac3
Wait as
the files are merged. Afterwards you should have one relatively big AC3-file.
Its size is the actual size! Remember that! We cannot compress this file. Well,
you can treat it in different ways with that “Soft Encode” program I talked
about, but I won’t talk about it in this guide.
You
can try to listen to the AC3-file, but if there is no audio, or you get an
error message, that’s no problem – we’ll fix it later.
You
can delete the small AC3-files now, and close the MS-DOS prompt (or cmd... damn
Win2K, makes it all so complicated =) ).
ONWARDS!
Step 2: Merging the Dolby Digital audio with the video
About
this step:
Now what do you know! This is the last step! Pretty short and easy guide, huh?
In this step we will use the very famous VirtualDub to merge the Dolby Digital audio from the AC3-file with the DivX video-file you already made.
It is the best if you’re a bit used to the program, but you’ll manage anyway.
The modified VirtualDub:
The normal VirtualDub won’t take an AC3-file and merge it with an AVI-file, that’s why we need the modified (no not by me =P) version you have downloaded.
The very first thing you have to do is extremely important because it makes your computer able to play AC3-audio as well as it makes this step possible to do. Go to the folder where you put the modified VirtualDub, and run “registerfilters-98.bat” if you use Windows 98.
If you use Windows 2000 run “registerfilters-2k.cmd”.
Merging the AC3 and the DivX AVI:
I really hope you’ve used VirtualDub before, because I’ll not explain very much as we go through this last step!
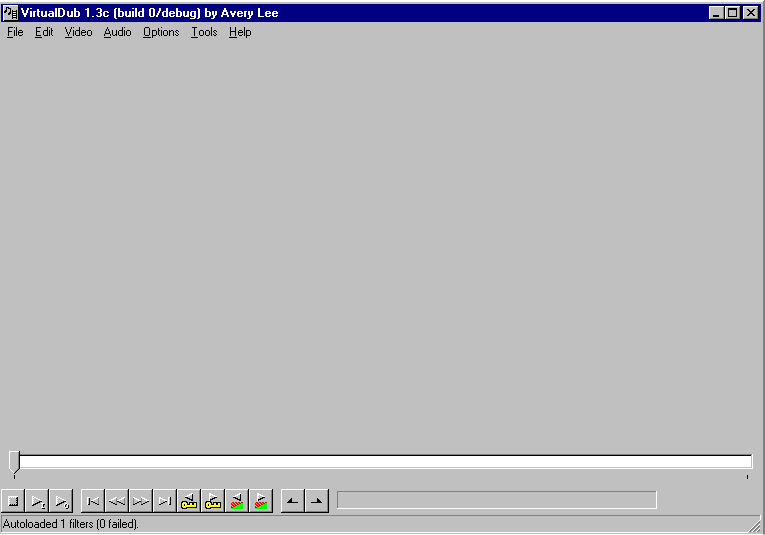
First, start VirtualDub USING THE “VirtualDub_ac3.exe”-file, this (hopefully familiar) screen comes up:

From here, we’ll just run fast through most of what needs to be done.
First, click “File” and open the video-only file you made without the help of this guide. Next, click “Video” and then select “Direct stream copy”.
Under “Audio”, select “Wav-audio”. In the box that comes up, make sure to select “All files” under “Filetype”. Then go select the AC3-file you made at the end of step 1. Back in the main window, make sure that “Direct stream copy” is selected under audio too!
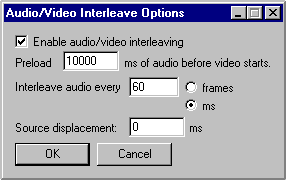
And now comes the annoying part – the interleaving! Click “Audio” and then “Interleaving” and a bit different box than in normal VirtualDub pops up:

Interleaving is the biggest (maybe only) pain in the ass when making Dolby Digital rip!
Now, usually, to prevent audio-desynching, you would lower the audio/video interleaving values right? Well, when making a rip with Dolby Digital audio, there’s a limit of how low you can go before the result is an either skippy or fast-forwarding rip. The only way I know of is to try different values and see how low you can go =)
What makes it all even more annoying is that some people can use an interleaving of 1ms on Dolby Digital rips without getting trouble!
I would recommend first trying 1ms, and if that give skippy or fast-forwarding video try using interleaving per 100ms as a “base” and then go up or down from there. As you can see in the above picture, I’ve tried 60ms. You’re just gonna have to start somewhere and see how the result is. If the playback is skippy or fast-forwarding, raise the interleaving values. If it’s not and audio is out of synch, lower it!
It is also smart to put in some preloading, I usually use 10000ms…
OK, time to start merging the yummy-yummy audio with the video!
Click “File” and then “Save AVI”. Name it whatever you want to, but remember to end it with “.avi”.
Wait as the processing does it’s thing (which won’t take long) and after that you should have a fully working Dolby Digital DivX rip!
You are done! Short guide huh? =)
Multi-CD rips:
No problem! The Dolby Digital rip splits into multiple CDs just like any other rip! I would however recommend using the modified VirtualDub to do the thing.
CONGRATULATIONS WITH A SUCCESSFUL
RIP!!!!!!!!!!!!!!!!!!!!!!!!